了解したかな?
Are you?
このページではメイカーフェア東京、アルス・エレクトロニカに展示していた箱の作りかたを紹介しています。
この作りかただけが正解ではありません。箱の大きさやレンズ、照明を変えて自分なりのものを作ってみてください。(2016.10.4公開)
参考)デイリーポータルZ記事:顔が大きくなる箱、アルスエレクトロニカで顔が大きくなる箱
直射日光を見ないことを了解した人だけ作りかたをお読みください。
了解したかな?
Are you?
(1) ダンボール箱
なんでもかまいませんが、奥行きが40センチぐらいのもの。
日本で作る場合はこれを使用しています
書類ホルダー120サイズ(38×32×29cm)
(2) フレネルレンズ
焦点距離が500mmのものが面白く・気持ち悪くなく見えました。
例:
DIY projector Fresnel Lens
plastic fresnel lens for projector
日本特殊光学樹脂 CF500
(3) LED
車やインテリア用のテープLED。発光色が電球色でないと顔がきれいに見えないので注意。
例:
LEDテープ ウォームホワイトSMD 500連 ホワイト12V
(4) 電池ボックス
LEDの動作電圧にあわせて用意してください。
例:
秋月電子通商 単3×8本用(フタ付プラスチック・スイッチ付)
上記リンクのものはスイッチもついていて便利です。
(5) コード
LEDテープ、電池ボックスをつなぐコード
(1) カッター
ダンボールを切るので
(2) アクリルカッター
フレネルレンズを切ります
(3) 粘着テープ
レンズとダンボールをくっつけます。透明のテープのほうが見栄えがきれいです。
(4) はんだごて・はんだ
LEDと電源、コードをくっつけます
(5) おかし
あきたときに食べます
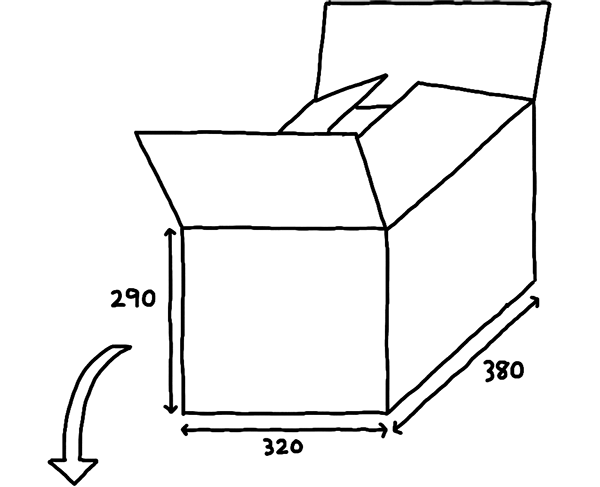
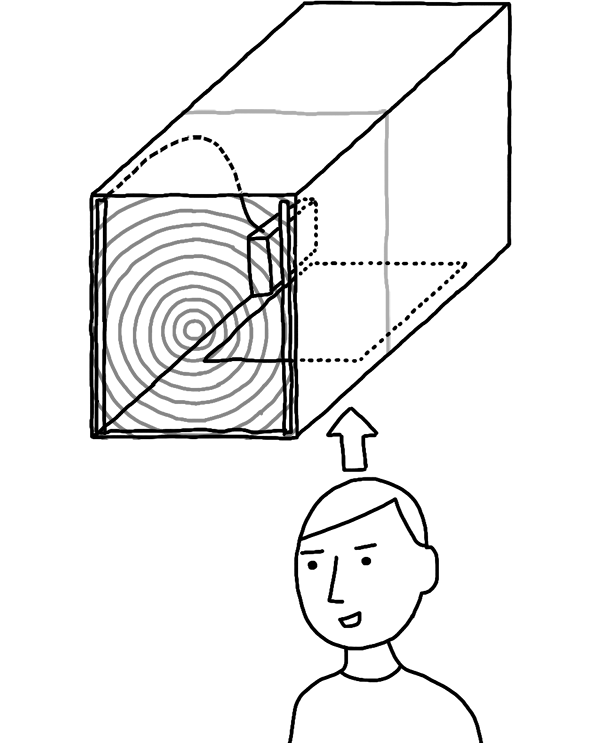
ダンボールを片面だけ閉じて組み立てる。閉じてない面が横になるように倒す。
Close one side of the cardboard and assemble. Lay down the box so the open side is on the side.
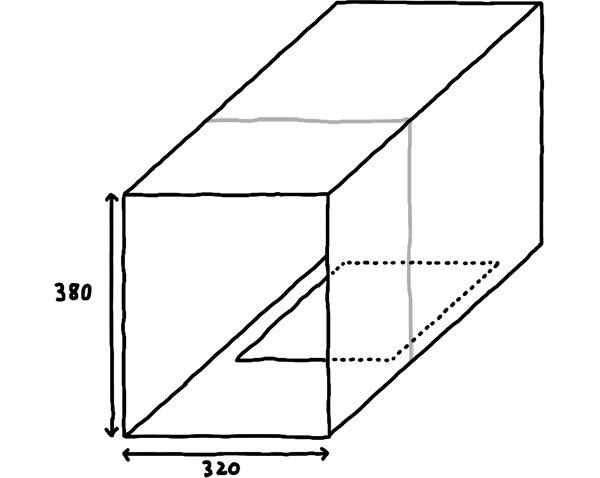
下に頭を入れる穴を開ける。手前から150mmぐらい離れたところがおもしろい顔に見えます。
Make a hole on the bottom where you can put your head in. About 150mm away from your head makes for an interesting face.
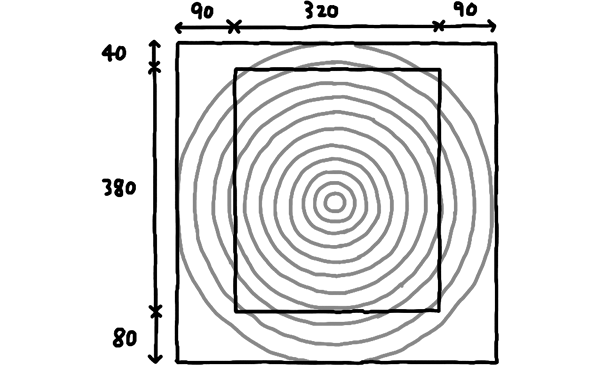
フレネルレンズを切る(上の数値はレンズに日本特殊光学樹脂CF500、箱に書類ケース120サイズを使用した場合のサイズです)。
レンズの中心が面のやや下にあったほうが面白い顔になります。が、別に中心でも構いません。
レンズはアクリルカッターで切ります。フレネルレンズの断面で手を切りやすいので注意してください(僕は3回切って手が血だらけになりました。軍手推奨です)。
Cut the Fresnel lens (the above numbers are only for when you are using Nihon Tokushu Kogaku Jushi CF500 and document holder 120 size).
Your face will look more interesting when lens' center is slightly under the surface. But it doesn't have to be like that specifically.
Cut the lens with an acrylic cutter. Please be careful not to cut your hands when you cutting the Fresnel lens' cross-section. (I cut mine 3 times and got them full of blood. Working gloves recommended.)

LEDを用意します。レンズが縦380mm×横320mmなので、1本の長さは360mm以下、LEDテープをつなぐコードは320mm以上にします。
LEDから電池ボックスまでの長さは適当です。
Prepare the LED. The lens is L380mm x W320mm, so make the length of one strip less than 360mm, and the cord to connect the LED tape more than 320mm.
The length between the LSD and battery box can be anything.
レンズを粘着テープで箱に固定します。つるつるの面を外側にしたほうがきれいに見えます。
レンズの内側、両脇にLEDテープを貼ります。裏に粘着テープがついているLEDテープが便利です。粘着がない場合は両面テープなどではりつけます。
電源コード、電池ボックスは箱の内側に固定します。
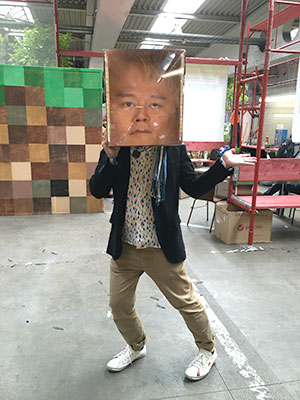
下から顔を入れて完成です。人を驚かせましょう。
かぶった人が直射日光を見ないように箱にも注意書きを書いておくか、屋内で使用してください。
Fix the lens to the box with adhesive tape. It will look better if you make the outside surface smooth.
Attach LED tape on both sides of the lens' inner part. It's convenient to have LED tape with adhesive tape on the backside. If it doesn't, use double-sided tape.
Fix the electricity cord and battery box on the inside of the box.
Once you put in your head from below, it's complete. Let's scare some people.
Please write a little note for people wearing it, not to directly look into the light. Or use it indoors.
おもしろいアレンジができたらぜひ教えてください。メール [email protected] か twitter @dailyportalz まで。
Please let us know if you've made an interesting looking face through [email protected] or on our twitter account @dailyportalz.
We will explain how to make the box that was displayed at Maker Faire Tokyo & Ars Electronica on this page.
This is not the only way how to do it. Please feel free to choose your box size, lens type, lighting and such yourself to get your desired result. (4/10/2016 open to public)
Reference) Daily Portal Z article: Face enlargement box, face enlargement box at Ars Electronica
Please only read the instructions if you are aware not to look directly into the light.
Yuji Hayashi
Close one side of the cardboard and assemble. Lay down the box so the open side is on the side.
Make a hole on the bottom where you can put your head in. About 150mm away from your head makes for an interesting face.
Cut the Fresnel lens (the above numbers are only for when you are using Nihon Tokushu Kogaku Jushi CF500 and document holder 120 size).
Your face will look more interesting when lens' center is slightly under the surface. But it doesn't have to be like that specifically.
Cut the lens with an acrylic cutter. Please be careful not to cut your hands when you cutting the Fresnel lens' cross-section. (I cut mine 3 times and got them full of blood. Working gloves recommended.)
Prepare the LED. The lens is L380mm x W320mm, so make the length of one strip less than 360mm, and the cord to connect the LED tape more than 320mm.
The length between the LSD and battery box can be anything.
Fix the lens to the box with adhesive tape. It will look better if you make the outside surface smooth.
Attach LED tape on both sides of the lens' inner part. It's convenient to have LED tape with adhesive tape on the backside. If it doesn't, use double-sided tape.
Fix the electricity cord and battery box on the inside of the box.
Once you put in your head from below, it's complete. Let's scare some people.
Please write a little note for people wearing it, not to directly look into the light. Or use it indoors.
Please let us know if you've made an interesting looking face through [email protected] or on our twitter account @dailyportalz.
デカ顔プロジェクトトップページに戻る Back to big face project homepage